Sunday, October 14, 2012

Pergola nip - n - tuck

 
Figuring
 
One more attempt to force
Fiddeling with it another evening after work and working the hammer and other persuasion.  Then sleeping on it and playing with level, plumb and square. 


Slipping in the new boards
 I determined that those joists were binding up the works and that they had to go.  So we cut out the middle, drilled out the single peg and pounded them back out of the mortise.  And it worked!  The structure that had fit togther so well in the driveway settled back to square and all of the pieces fit perfectly!  Pshew!


Mostly done
Next step is to cut the moutise's an inch deeper (take advantage of the notch I had put in the header) and use a cut down 2x8 to replace the 2X6 I had extracted.  This allowed a little beefier structure (still avoiding corner braces); filled in the new mortise and allowed the reuse of the predrilled holes.  I also used my thickness planer to resurface the board by 1/32 to allow it to slide in from the end with minimal binding.
 
The details

Originally I had used one peg for each connection to allow the structure to move as I leveled, plumbed and squared the structure.  As it turned out the morteses were so tight that there was no movement in this regard.  Now I used the come along bring the structure as true as possible and complete the pegging (2 for each joint).  A little copper flashing for the tops of the posts and we are ready for the gardners to take over.

17 slats in a row


Westeria will block this view

The Pergola at the Pond

Pergola - Assembly (part one)

The forecast for the week is rain!  But, today, Monday, looks like it will hold off for a bit.  I decide to take the day off and try to get the pergola planted before the rain starts messing with our beautiful holes!

Heading to Lowes to pick up straps and a come along and perhaps a 12 lb sledge hammer - but first a stop at our neighbor's to see if they have these tools.  I'm in luck, Bruce Glick is out at the barn and everything I need (including a 20 lb sledge - just in case the 12 ponder isn't sufficient) is just inside the door - including two twenty foot towing straps! 
 
Come along is the right tool for this job!
  Back home, Sarah remarks that I'm back awfully quick and joins me for a ride out to the pergola by the pond site.  Come along and sledge make short work of assembling the headers and posts.  The extra towing strap makes it easier to pull these assemblies into position.

 
Header assembly


224 Horses at the Ready

Now for the hard part.  If I had a crane or 3 strong helpers, I could have assembled the structure out of the holes and then set it in, but I'm working solo for the structural parts.  
Oops


Relieved the top to fit through
I thought that with the end profiles there would be enough room to bring the structure together but the angle of the posts was too great and the joist bound in the mortise.  I could have chopped the mortise bigger or plained the joist thinner so that it could be inserted from one side and pulled all the way through but I wanted to keep everything tight.  So I "solved" the problem by cutting the top of the joist so that it would not bind as I pulled the structure together. 
Visual Progress by the mm
  
Hours were spent getting the joists to fit and the fit was so tight that even with the 2 ton come along it took rocking the entire structure to bring the pieces into position.  When all was in place the remaining joists fell into position . . . except for the two on each end which were out by an inch or more @#$%&!
Perhaps it's just a leveling thing
 
Close but no Cigar


Pergola Site

About 12 hours of milling got the pieces cut, shaped, chopped and beveled.  One 35 Gal garbage can full of cutoff pieces and sawdust!  Now for the fun part - no electricity out by the pond - hope I didn't forget anything.

 Sarah had mowed to help mark the location but she and Sandy had not finalized the location.  So we walked about and sized things up from every direction and began the first holes.


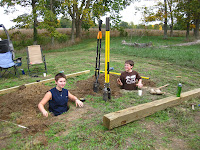
 A few hours later the calvery arrived in time for the other two holes (yes Sarah and I are thoughtful and patient diggers).  Sandy's truck makes easy work of delivering the "kit" to the site on the far side of the pond.

 
 Morgan and Quinn made short work of the digging and waisted little time in turning work into fun.


First attempts at hammering the pieces parts together, failed.  The ends make it through the mortise but will go no further.   I think I need a bigger hammer (and other tools)!

Pergola Posts

For this design I decided to use mortise and tenon joinery with one inch pegs holding the structure together.  I oversized the header to 2X10 in the hopes that I could eliminate the need for corner braces.  I also oversized the rafter at the post to 2x7 for the same purpose.

The mortises are first drilled then chopped square.  Working for a very tight fit as this wood is wet and everything will shrink as it dries.

 
 I used a 2x4 piece to test fit the mortise - they are snug!


I had thought to peg the joists to the rafters but decided that notching would provide more anti racking structue so I milled the notches - again as tight as I could and still get the structure to go together.

 I suspect I will wind up pegging these as they dry out and the notches loosen up.


With the test fit in the driveway - everything is tight and square with the roof structure.


 Funny how easy this is on the flat level ground.  Lets see how it is in the air . . .

Pergola Rafters Galore

 
 Step one was checking out the internet for pictures then drawing up the plan and creating the parts list.   I priced it for both 4x4 and 6x6 posts and decided it is worth the $$ to go with the larger posts.  

One ton of pressure treated (wet) wood
 With almost 1 Ton of materials Sandy's pickup truck was key to getting the pieces back to the pond. 
      
Setting up for Production Cutting
 

Rafters adding up
  
After dragging out all of the tools needed for the machining of the rafters we proceed with cuting each to length. 
Planing the edge profile

Created a little plywood jig to cut the profile for the ends and used a power hand planer to bevel the edges


End of the first afternoon  

Rafters sized and profiled - Posts are next


Saturday, October 13, 2012

Pergola at the Pond

Sarah says I should blog - so here we go (I always do what Sarah says).

Decided the pond needed a pergola so we partnered with Sandy, Sarah, Morgan and Quinn to make it so.  
Quinn assisting to square the deck (mark the holes)

Morgan and Quinn doing the hard work

Testing for depth (some call this fun)


But I'm getting ahead of the story (flash back).